Why Choose a Thermit Welding Mold?
A Thermit Weldig Mold provides the controlled shape needed during thermite welding. It surrounds the rail or metal joint and contains the molten reaction material. This helps form a consistent weld profile under demanding field conditions. Experienced welding teams know that mold quality directly affects joint accuracy, surface finish, and post-weld work.
The mold is usually made from heat-resistant, carefully shaped material. Its internal cavity matches the joint geometry closely. When properly installed, it supports controlled metal flow and reduces unwanted leakage. This matters beside active rail lines, in maintenance yards, and at remote industrial sites. A well-fitted mold also helps technicians reduce grinding time after cooling.
Small details matter.
Clean joint faces are essential. Correct alignment is equally important. Moisture, damaged edges, or an incorrect mold size can weaken the result. For this reason, qualified workers should follow approved procedures, inspect each component, and use suitable protective equipment. Manufacturer guidance and relevant industry standards should guide every application.
Choosing a Thermit Weldig Mold is not simply a purchasing decision. It is a decision about repeatability, safety, and practical control. Still, no mold can compensate for poor preparation. That point is easy to overlook. Reliable results come from combining a suitable mold, trained technicians, controlled materials, and careful inspection. Performance should be verified on the finished joint, not assumed from appearance alone.
Why Choose a Thermit Welding Mold?
What Is a Thermit Welding Mold?
A thermit welding mold is a heat-resistant refractory form used to join two metal rail ends. It fits around the prepared joint and creates a sealed cavity. During welding, thermit material produces molten steel inside this cavity. The mold directs the metal around the rail ends and helps form a consistent weld shape.
Its design is more precise than it looks. The mold must match the rail profile, joint gap, and welding equipment. Small errors can cause leakage, uneven filling, or surface defects. In practical work, technicians inspect the mold for cracks, moisture, and poor alignment before use. Moisture matters. Even a little can create serious problems when exposed to extreme heat.
A suitable mold also supports cleaner preparation and more repeatable results. It keeps the molten metal contained while the rail ends reach the required temperature. However, the mold cannot correct damaged rail ends or careless alignment. Preparation remains critical. Trained workers should follow approved procedures, use protective equipment, and check the finished weld through visual and technical inspection. The process is reliable when each detail receives attention. It is less forgiving than many diagrams suggest.
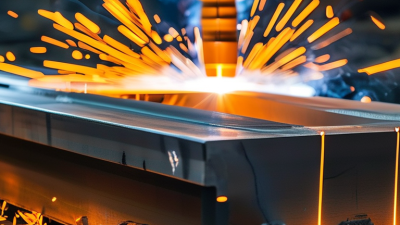
A thermit welding mold shapes and contains molten steel during a rail repair. Its work begins after technicians align and clean the rail ends. A measured gap is left between them. The mold is sealed around this joint with refractory material. Heat matters. A thermite charge reacts inside a crucible, producing extremely hot molten steel. This metal flows through a tap hole and enters the mold. The mold keeps the liquid steel in position while it fuses with the prepared rail surfaces.
As the metal cools, the mold supports the new joint and helps form a controlled weld profile. Technicians then remove the hardened mold and trim excess steel. Grinding restores the rail’s running surface. They also inspect alignment, hardness, and visible defects before the track returns to service. Fit matters. A poorly sealed mold may leak, while inaccurate preheating can weaken the weld. Experienced crews follow approved procedures, use calibrated tools, and wear suitable protective equipment. The process is reliable when each variable is controlled, but it is not a magic repair. Weather, contamination, rail condition, and operator judgment can still affect the result. That deserves careful review.
| Dimension | How the Thermit Welding Mold Works | Typical Fact or Data | Why It Matters |
|---|---|---|---|
| Primary function | The mold surrounds the prepared joint and forms a controlled cavity for the molten weld metal. | The mold is shaped to match the workpiece profile, such as a rail, reinforcing bar, cable, or structural steel section. | A correctly shaped cavity controls metal flow, joint geometry, and the final weld profile. |
| Heat source | A thermit charge undergoes an exothermic reduction reaction, producing molten metal without an external electrical power source. | The reaction commonly uses aluminum as the reducing agent and a metal oxide as the oxidizing component. Reaction temperatures can exceed 2,500°C. | The high-temperature reaction can melt and fuse the prepared joint in locations where electrical welding equipment is difficult to use. |
| Mold material | The mold is made from a heat-resistant refractory material that contains the molten metal during pouring and solidification. | Common mold materials include refractory sand, ceramic-based compounds, and other formulations designed for high-temperature service. | Refractory materials resist melting and reduce heat loss while the weld metal is solidifying. |
| Single-use design | After the weld cools, the mold is normally broken away to expose the completed joint. | Most thermit welding molds are consumable and are used for one weld location only. | A disposable mold can closely fit irregular profiles without requiring complex reusable tooling. |
| Joint preparation | The workpiece ends are aligned, cleaned, and positioned with the specified root opening before the mold is installed. | The required gap, alignment tolerance, and profile preparation vary by workpiece type and applicable welding procedure. | Poor alignment or contamination can cause incomplete fusion, inclusions, dimensional errors, or excessive finishing work. |
| Preheating | The joint area and mold are preheated before pouring to remove moisture and limit rapid heat loss. | Preheating temperature and duration are procedure-specific and are commonly checked with temperature-indicating tools. | Proper preheating helps reduce porosity, thermal shock, premature solidification, and hydrogen-related defects. |
| Metal delivery | After ignition, the molten steel collects in a crucible and is released into the mold cavity through a controlled tapping operation. | The mold normally includes gates, risers, or feeders to guide flow and compensate for solidification shrinkage. | Controlled filling reduces turbulence and supports a sound, continuous weld across the joint. |
| Solidification | The molten weld metal cools inside the refractory cavity and fuses with the prepared surfaces of the workpiece. | Cooling time depends on the component size, steel grade, ambient conditions, and the approved welding procedure. | Controlled cooling helps limit distortion and supports the required mechanical properties of the joint. |
| Finishing work | Once sufficiently cooled, excess metal is removed and the joint is ground or machined to the required contour. | Rail and precision applications may require profile gauges, grinding templates, or dimensional inspection. | Finishing restores the functional profile and removes risers, flash, and surface irregularities. |
| Equipment needs | The process uses a mold, crucible, thermit charge, ignition system, alignment tools, preheating equipment, and finishing tools. | It does not require an arc-welding power supply, although accurate preparation and temperature control remain essential. | The relatively independent setup is useful for field repairs, remote infrastructure, and heavy sections. |
| Key advantages | The mold provides repeatable joint geometry while the thermit reaction supplies the required heat and filler metal. | Main benefits include portability, suitability for large cross-sections, and reduced dependence on external electrical power. | These characteristics make thermit welding practical for many outdoor and infrastructure applications. |
| Main limitations | The mold cannot compensate for incorrect preparation, unsuitable materials, or deviations from the approved welding procedure. | The process involves very high temperatures, combustible materials, molten metal, fumes, and a generally non-reusable mold. | Qualified personnel, protective equipment, ventilation, fire controls, and inspection are required for safe and reliable results. |
Note: Temperature ranges, joint gaps, preheating requirements, cooling times, and acceptance criteria must be taken from the approved welding procedure and the applicable industry standard for the specific workpiece.
Why Choose a Thermit Welding Mold?
A thermit welding mold controls molten steel around two rail ends. Its material affects heat resistance, sealing, and weld shape. Refractory sand molds are economical and adaptable. They suit occasional repairs and unusual rail profiles. Graphite molds offer sharper dimensions and better repeatability. They can also support controlled reuse, although damage is easy to miss.
Mold design matters as much as material. A correctly shaped cavity guides molten steel into the rail gap. Runners control flow, while risers collect impurities and shrinkage. Preheating remains critical. Cold or poorly fitted molds may create leakage, incomplete fusion, or visible pores. EN 14730-1 requires approved aluminothermic welding procedures for rail applications. The European standard also emphasizes process control and inspection. The U.S. Federal Railroad Administration’s 2023 safety data recorded more than 11,000 track-caused accidents and incidents. That figure does not isolate thermit welds, but it shows why small installation errors deserve attention. Weld quality is never only a mold issue.
Tips: Match the mold to the rail profile, gap, and welding charge. Check the cavity for chips before fitting. Keep alignment tight. Do not trust a mold because it looks clean. In field work, I would record preheat temperature, mold condition, and post-weld inspection results. The International Energy Agency’s 2023 rail analysis notes rail’s strong energy-efficiency advantage over road transport. Reliable welds help preserve that advantage, though field conditions can still defeat a perfect design.
A thermit welding mold controls molten metal around a rail joint. Its shaped refractory cavity supports accurate alignment and limits metal loss during pouring. This matters in remote track locations, where transport, power, and working space are limited. Network Rail’s Annual Report 2023–24 describes a network exceeding 20,000 route miles. Field-friendly joining methods therefore remain important for large infrastructure systems.
The main benefit is process control. A correctly fitted mold helps maintain the joint profile, while its insulation supports steady solidification. Less cutting and grinding may reduce finishing time, although results depend heavily on preparation. The Federal Railroad Administration’s Railroad Safety Statistics report continues to identify track and equipment conditions as major safety concerns. A sound weld can support safer maintenance, but it cannot correct poor geometry or worn rail ends.
Experienced technicians check gaps, preheat temperature, mold sealing, and metal flow. A damaged mold can leak, shift, or produce an uneven weld. That weakness is easy to overlook. Another practical advantage is repeatability: standardized molds give crews a familiar setup across different repair sites. However, field conditions are rarely perfect. Wind, rain, contamination, and rushed inspections can reduce reliability. The mold is useful, not magical. Independent inspection and documented procedures remain essential, especially where rail loads and temperature changes are severe.
Why Choose a Thermit Welding Mold?
How Should a Thermit Welding Mold Be Selected and Handled?
Selecting a thermit welding mold starts with the rail profile, not the product label. The mold must match the rail section, joint geometry, and approved welding procedure. Check the rail ends for square cuts, correct alignment, and a controlled gap. Even a small mismatch can create flashing, shrinkage, or an uneven running surface. That detail is easy to underestimate.
Material condition matters too. Choose a mold made for the required heat and metal flow. Inspect every piece for cracks, chipped edges, moisture, or distorted cavities. A mold can look clean and still be unsuitable. Store unused molds in a dry, protected cabinet, away from rain and ground moisture. Dampness is dangerous during heating. Follow the welding procedure, site risk assessment, and applicable railway standards.
Handle each mold carefully. Do not drop it onto concrete or force it onto misaligned rails. Remove loose particles with a clean, dry tool, then seat the mold evenly around the joint. Experienced crews also confirm sealing material, preheating distance, and clamp stability before ignition. These checks feel repetitive. They are not wasted time. A rushed inspection may pass unnoticed until the weld cools. After casting, allow the joint to cool as required, remove the mold safely, and inspect the weld profile under proper lighting. Record defects rather than hiding them; a small imperfection deserves a second review.